Cookies help us deliver the best experience on our website. By using our website, you agree to our use of cookies. Learn more...
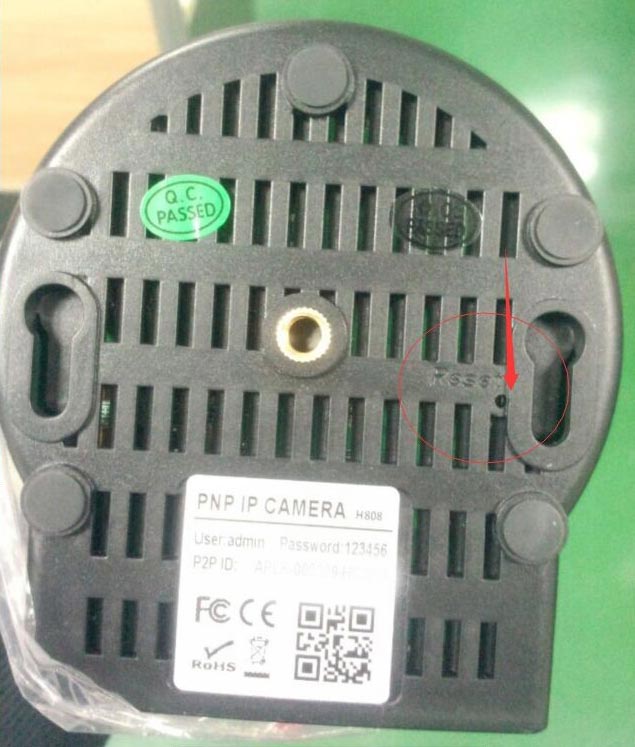
Default password is 8888 and username is admin; you can reset your camera password by pressing reset button at the back of the camera for 4-5 seconds. (Camera should be Powered On) , this will change the password to default.
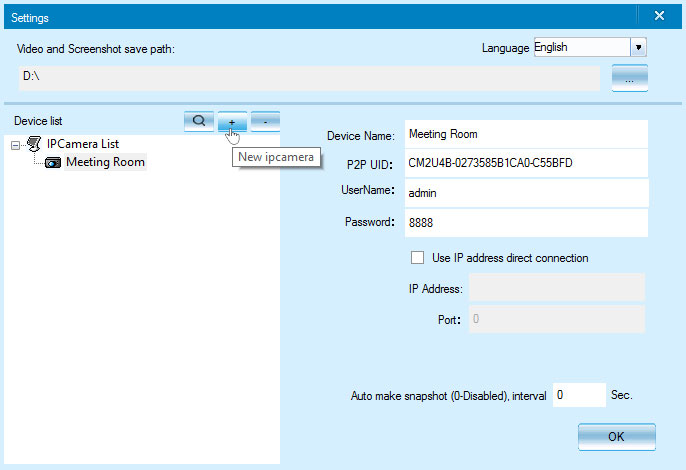
You can enter username: admin and password: 8888 to enter in PC Client.

Power on the IP Camera by using the supplied power adapter, connect it with router by net cable. The camera will then start and initialize itself by rotating Pan/Tilt one round respectively. The green LED (at 6-o'clock position) will flash slowly, which indicates that the Camera is ready for work.
See Video OR go to "IPCamera Setup" in CP and click "+" then enter Camera UID, UserName and Password and click "OK" to continue. Default UserName is "admin" and Password is 8888. To delete camera, select camera id in "IPCamera Setup" and click "-" to delete the cam.
To change password of IP camera. Click on "Change Password" button at the top of menu.
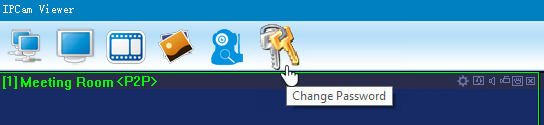
To change your password,
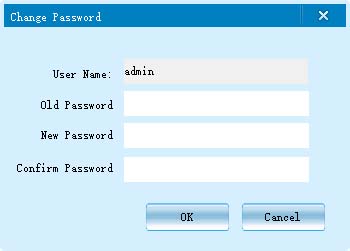
Every IP cam default username is "Admin" and password is "8888" you can login through. You can change the password from setting page later.
You can download software from support page for PC and android phone App. You can also download mobile applications from, Android: Search "iGoodCam"and download from play.google.com
8 users.
The wizard will detect device in your network, and it seems like a virus. Please ignore the warning and continue.
Please make sure the network cable is connected and turn off firewall and security software on your computer.
The camera's default username is admin, password is 8888. If you forget your username or password, you can reset the camera to factory settings to get the default username and password.
Remove the protective film on the lens and rotate the lens of the camera to get a clear image.
Maybe the camera is stuck. Please rotate its head manually to fix it.
Please tighten the antenna of the camera. Make sure it is not far away from the router and there is no big barrier between the camera and the router.
There are 3 levels of user authorization in user management.
An Internet protocol camera, or IP camera, is a type of digital video camera commonly employed for surveillance, and which, unlike analog closed circuit television (CCTV) cameras, can send and receive data via a computer network and the Internet.
Mail service is a preparation for the alarm function. When your camera is triggered, it will send you an email attached with captured photo. As Premise, you should set mail service right, and test ok. Open "advance Config"
In "Email Config" you can setup email for motion detection alerts.
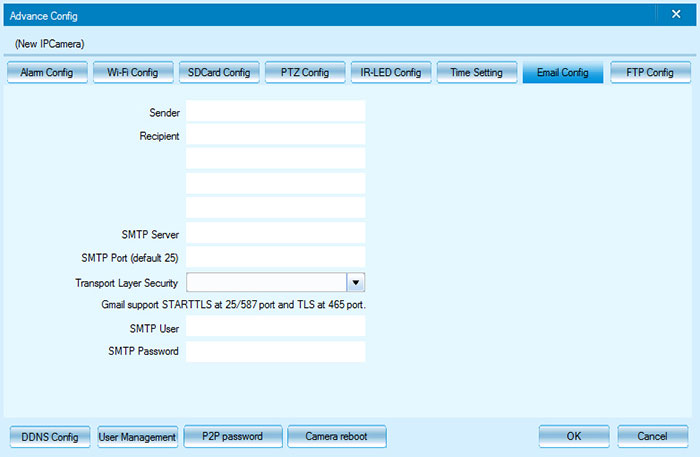
Sender: Enter an email address which will use as sender.
Recipient: You can enter up to 4 recipient email addresses.
SMTP Server: Enter SMTP server of the sender email address. You may find on below table.
SMTP Port: Enter SMTP port of sender email address. You can enter 25 as default.
Transport Layer Security: Transport Layer Security (TLS) is a protocol that ensures privacy between communicating applications and their users on the Internet. For Gmail, select STARTTLS and for other mail services you can skip this field
SMTP User: Enter again the sender email address. (There is no @domain.com, only the username)
SMTP Password: Enter the password of the mail address which you entered in SMTP user. After completing these field press "OK". Then email test will begin! If massage shows,
Error: Authorization failed: Might be interred incorrect email and password in the field SMTP user and SMTP password.
Error: Invalid Recipients! : You did not enter any email in recipient field. At least enter 1 email in recipient field.
Error: Time out!: server is not responding, session expired. Again click on "OK" button to continue.
Success: It means you have successfully done email setup.
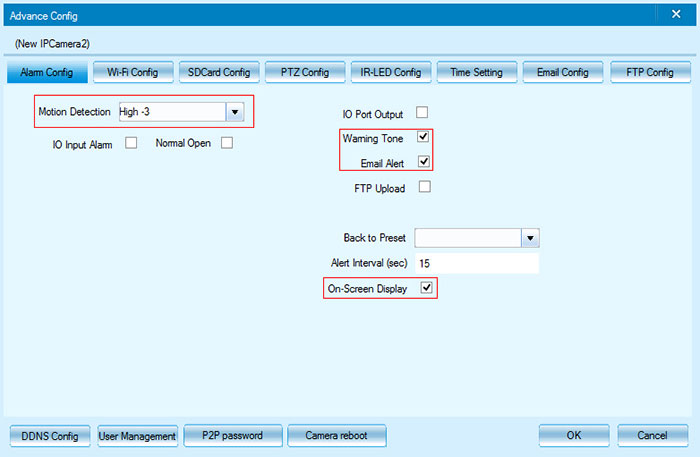
You can reboot your camera In "Alarm Config" of "advance Config".
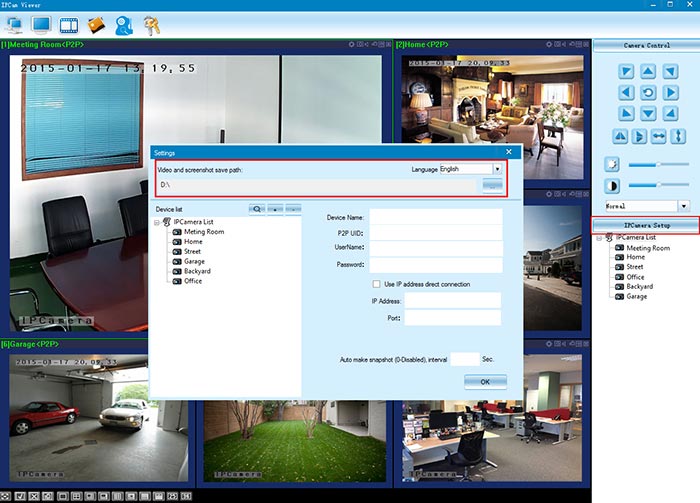
You have to first select save path of snapshot/captured images then you can take screen shorts by click on snapshot button at video menu of camera.

Open "advance Config" of camera, in "Alarm Config" enable "Motion Detection" (you can set "High-3") and Email Alert, Warning Tone and On Screen Display.
you can select video and screen shorts save path in setting of "IP Camera Setup".
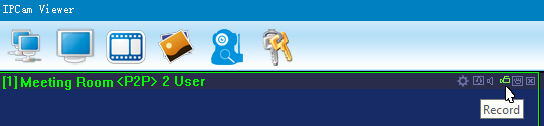
You have to first select save path for recording then you can record video by click on the "Record" button at video menu of camera. And then again click for stop recording. You can find recorded video at your selected location.
You can listen voice and speak to the next person. There are options at the menu of camera.

If the video result is blurry and poor quality. First make sure to remove the protective film on the lens and rotate the lens of the camera to get a clear image. Then, you may change the video quality in control panel.

There are 3 levels to set video quality.
You may change into HD to get better result and it's depends upon your internet.
You can connect all available cameras at a time to view on one screen by just one click. There is option in the top menu of the CP.
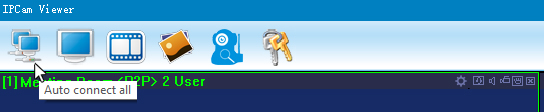
You can find this option also is in the bottom of the CP. And also option for close all windows by click on "disconnect all windows"


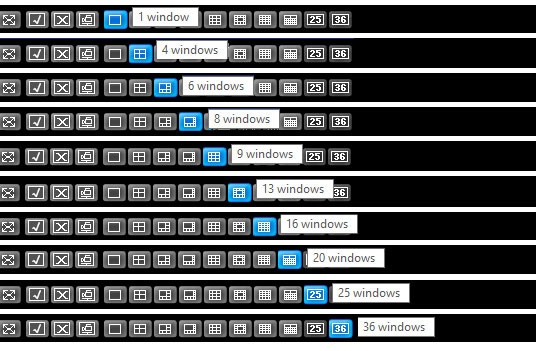
You can view up to 36 multi-camera video streaming at a time. There is an option in bottom of CP to switch between multi windows.
Yes, you can record multi-camera video streaming at a time. Recording will begins of all live cameras if you press the button in the bottom of the CP.

Make sure the equipment and PC is in the same LAN; if install firewall software, please close it and try again.
If the IP address of IP camera and PC is not in the same Network Segment, you should change them on the same Network Segment before visit. Network Segment is the first three number of IP address. If the IP address of PC is 192.168.1.89, so it can only visit the equipment which IP address is between 192.168.1.1~192.168.1.255.
If you are running other bandwidth-heavy tasks, such as downloads, peer-to-peer applications, or audio/video streaming, this may cause the camera's video feed to be delayed. To improve the quality of the video feed, close or stop any bandwidth-heavy applications when viewing your camera's Live View. Your camera requires at least 256K of bandwidth to stream video properly.
1. Please check if your camera work normal or not; check the status of the lights on RJ-45, network cable is good or not, the connection of network and power is good or not, whether camera pan/tilt after power on.
2. Whether your router enable DHCP function; if disable Mac address filter.
3. Computer and camera in the same subnet or not; the firewall block the camera or not.
4. If you have another router, please plug the camera in it and try again.
5. If you tired all the above steps and still failed, please use a network cable connect the camera and your computer directly, check if the IP camera search tool can detect the camera or not.
Check if the microphone in computer used to talk turned on or not; makes sure active the microphone icon in video window; and network speed is not so bad.
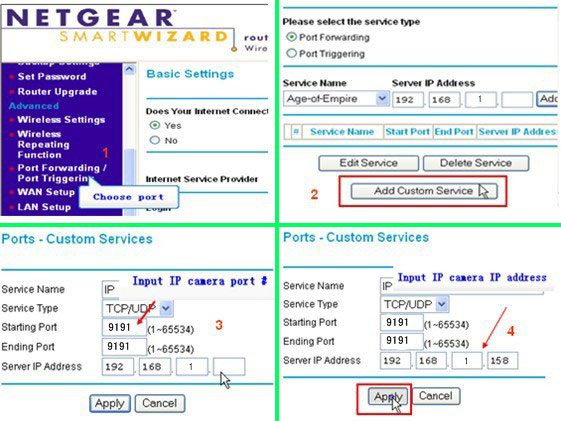
You can do port forwarding as blow steps. Operation Steps: After login the interface of the router, choose "Port Forwarding" Choose "Add custom Service" Input IP camera http port Input IP address of IP camera, click "Apply" After finishing the port forwarding, you can use WAN IP address of router and http port of camera to visit the camera by remote computer. Note: If the routers are different, so the interface and setting method of router are also different, how to do the port forwarding for various routers, please refer to the user manual of your router or consult with router manufacturer.
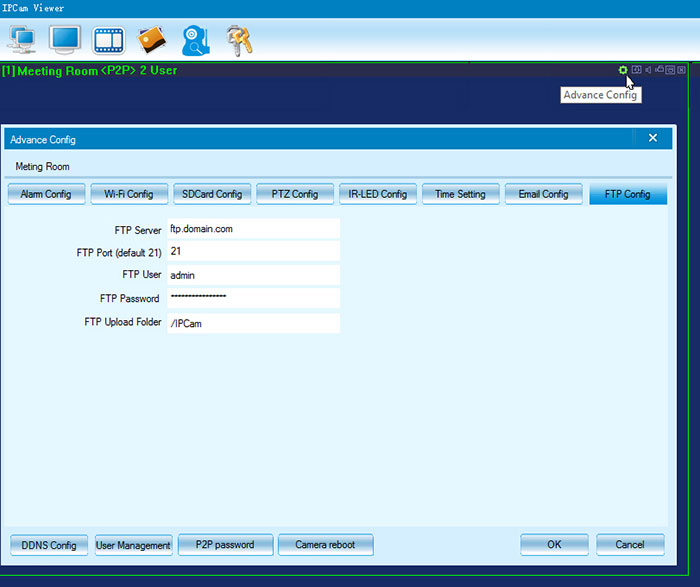
The File Transfer Protocol (FTP) is a standard network protocol used to transfer computer files from one host to another host over a TCP-based network, such as the Internet. You can configure camera to FTP server by "FTP Config" In advance configuration of camera.
To view the video, first add your camera in the CP. Then double click on the camera id to view the video.
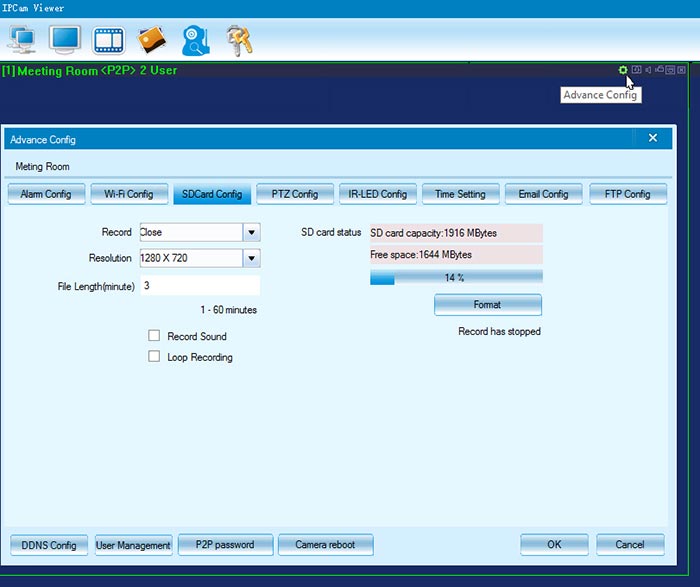
You may configure SD Card "SDCard Config" In advance configuration of camera. And also you can see data storage status and can format the SD card.
You may change the "Pan/Tilt" Speed of the camera by "PTZ Config" in advance configuration of camera.
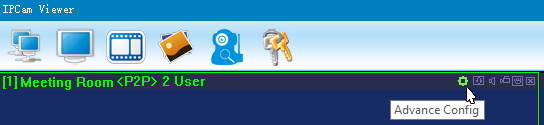
Advance configuration can find at the top of every camera streaming windows.
You may find your camera's UID (Unique Identifier) at bottom of the IP cam.
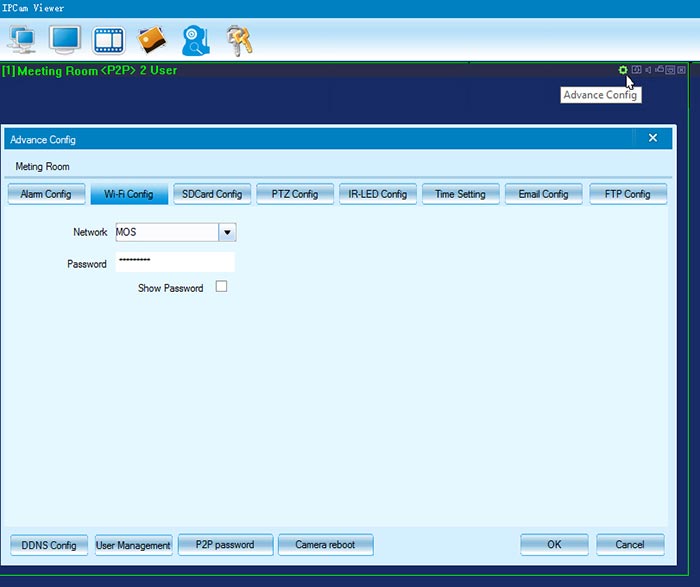
If you are Configuring camera by CP. First connect camera to the router by cable. Then go to the "Wi-Fi Config" in advance configuration of the camera. Choose a target Wi-Fi Network and input password, and then disconnect net cable when the camera starts initialization. After initialized, the camera will switch to Wi-Fi connection in 60 seconds.
Note:
1) Please make sure that the target Wi-Fi Network works normally and you have access to it (password is correct); otherwise the Wi-Fi configuration will fail (although the camera will initialize too), and you need to configure again.
2) The interface of iOS and Android maybe different slightly. Can configure camera connected without net cable to Wi-Fi connection (see user manual page: 3).
To access your Settings, click the setting icon "Advance Config". This will clickable whenever you are viewing video. It's on the right corner of your video window.
This IP Camera can move up to Pan: 350-Degree and Tilt: 120-Degree.
It very simply compares what it sees now to what it saw in the last frame and based on a sensitivity you select will trigger an event. The event can be to send an email, to send an image to a FTP server, or to send a series of images (before and after the motion is detected) to an email address or a FTP server-all with software built into the camera, nothing else is required.
Sometimes there are issues with the indoor camera's audio where you may hear a lot of static, especially if the camera is on wireless. To do some general testing, try using the camera on a wired connection and see if you receive the same static.
This IP camera's night vision support up to 8 meters (26.24 feet). If the object is outside of 8 meters. It will show the black screen. Check the IR-LED configuration in the "IR-LED Config" at Advance Configuration. It's on the right corner of your video window and Mark in "Auto" if marked "Close".
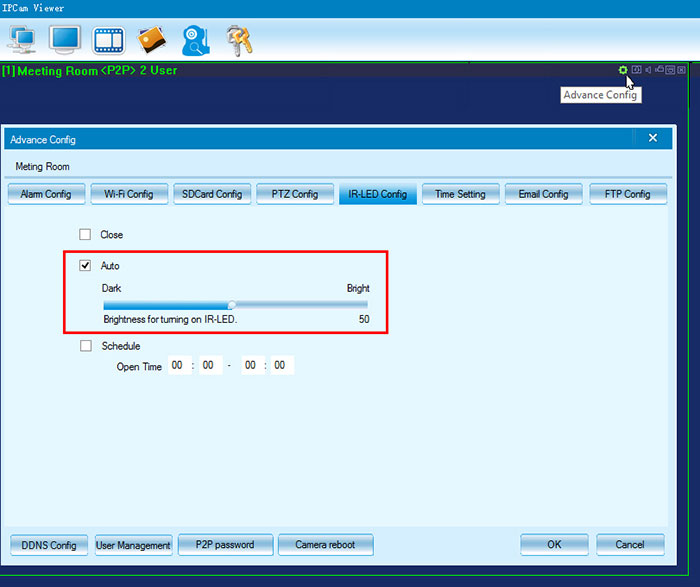
Sometimes the IR lights might get "stuck" We suggest trying to flash a flashlight a foot in front of the camera, thereby blinding it. When it comes back it resets the IR LEDs, and the night vision may start to work again.
Once port forwarding has been done and you've confirmed your camera IP and your ports are open and allowing traffic, you should be able to view your camera remotely. To do this, go to any browser and type in the following in the URL bar: http://yourcamipaddress:yourport
Operating temperatures of the IP Cam is 0°C ~ 55°C (14°F ~ 131°F) and operating humidity is 20% ~ 85% non-condensing and Storage Temperature is -10°C ~ -60°C (14°F ~ 140°F) and storage humidity is 0% ~ 90% non-condensing.
If the memory card is full, it will automatically overwrite previously stored data.
Yes, it supports Wi-Fi Protected Setup (WPS).
Yes, but the battery's voltage and current should be the same as the adaptor of IP Cam. For power bank; you should have the cable to connect the camera with power bank.
There is a reset button at the back of the camera. Power on and press the button for a few seconds to reset.
Yes, it is.
Gmail requires encryption for its default SMTP server. This is often not supported by IP cameras. So the solution is to use STARTTLS at 25/587 port and TLS at 465 port.
No, you of course, can have a real, public, static IP address for each camera, however, using just one static IP address for your router and a virtual server or port forwarding scheme, you can use many cameras with just one static IP and just about any router. Please also note that the IP camera must have an adjustable web server port (you must be able to change the web server port) to use multiple cameras behind a router.
IP cam's IR filter allows infrared (IR) light between 810nm and 870nm. The LEDs on the camera emit light with a wavelength of 850nm. With support up to 8 meters (26.24 feet) and 0.5lm (minimum lux).
Yes, it is RTSP (Real Time Streaming Protocol) compatible. It works on the following URLs,